
Author: Evan Strobelt
The suspense was palpable as we led a team of medical students into a simulated trauma room for the championship case in the SIMS tournament. These students had already worked through multiple cases throughout the day, each team member practicing a role in the management of critically sick patients.
The mannequin for this case lay hidden underneath a blanket but the competitors were immediately met with their first clue—the strong scent of burned cloth. EMS delivered their report: “There’s an apartment fire a few blocks down from here with multiple casualties. We transported this 42-year-old male with respiratory distress en route and he became unresponsive just as we pulled in to the ED. He’s tachypneic to the 30s, tachycardic to the low 100’s, but SpO2 has been at 100% for us the whole time.”

GO!
One team member ran over and immediately started strapping on the blood pressure cuff while another checked the airway. “Given his low GCS, I’m concerned he’s not protecting his airway. I think we need to intubate!” The team leader agreed, “Ok. Let’s pre-oxygenate with BVM and prepare our equipment and medications for intubation.”
The team scrambled over to the airway cart, hastily grabbing the necessary equipment and filling the syringes with the proper sedatives and paralytics. The team member at the head of the bed tried to administer resuscitation breaths via the bag valve mask. A loud woosh of air could be heard squeaking past the seal on the side of the patient’s face. “I’m getting a lot of resistance here. I’m worried we’re not ventilating well.” He frantically looked at the vital signs monitor, the SpO2 was still at 100%. Puzzled, he turned back.
The team leader made a decision, “OK, we need to intubate now!” The team members set the bag valve mask aside and immediately passed the laryngoscope and endotracheal tube to the head of the bed. “I can’t intubate. The airway is completely swollen. I can not pass the laryngoscope or see the cords.”
“Well, we need to perform a cricothyrotomy now then. Prepare the cricothyrotomy tray.”
Like a magician revealing a grand trick, the case facilitator lifted the blanket that covered the cricothyrotomy skills trainer mannequin. The team paused for a second, shocked that the procedure they had just practiced an hour earlier was now expected of them in this high-stakes case. A team member stepped forward and grabbed the scalpel, his heart pounding. This is what he had trained for.
Although it may be slightly more exciting to perform a cricothyrotomy on a mannequin with a face, it’s absolutely not necessary to be able to develop the proper skill set and muscle memory needed to repeat the procedure well during a high-intensity situation like this championship case or even more so, in real life.
Surprisingly, there are actually some fairly affordable cricothyrotomy trainers, but the cost of all the replacement parts will significantly add up over the years. So, why not try your hand at 3D printers and a combination of easily-affordable replacement parts to create your own cricothyrotomy trainer?
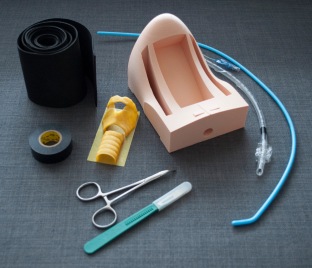
At the bottom of this article is a full list of materials needed for this cricothyrotomy trainer and links to where you can find them at an affordable price. Once you have all the supplies, let’s go through what you need to do to assemble the cric trainer.
Cricothyrotomy Trainer Assembly
Step 1: Print your 3D pieces including the neck and trachea. Note that 3D printers can be quite a challenge, whether you’re printing it yourself or sending it to a
 third party to have it printed. Check out our separate article on 3D printers for tips and tricks to navigating this process.
Step 2: Place the 3D printed trachea inside the neck piece.

Step 3: Place a thin strip of electrical tape over the trachea. This will simulate the cricothyroid membrane.
Step 4 (Optional): If you want to simulate a bloody cricothyrotomy, pack a snack-sized Ziploc bag with a small amount of fake blood (use our affordable recipe for washable blood here). Place this liquid-filled bag over the trachea, ensuring that the liquid rests over the cricothyroid membrane so that when it will spill out when the student cuts through it.
Step 5: Slide your EVO foam through the two slits on the side of the neck piece and wrap it over the top of the trachea. This foam will simulate the skin and subcutaneous tissue. Note that it is best to cut a thin, long strip of EVO foam. I found that cutting it slightly smaller than the actual length of the slits on the neck piece allowed it to slide through the neck piece much easier. Also, by cutting a long strip you can just slide the EVO foam over an inch or two after each student practices the procedure. This allows you to easily prepare the trainer for another procedure after each attempt and allows you to maximize the use of your EVO foam.

Let’s start practicing!
Now, you’re ready to perform the cricothyrotomy. Since this is a very rare procedure, I found that there was not a lot of evidence that supported one particular technique as being better than another. Below I have included links to several videos and other articles that discuss various techniques for performing a cricothyrotomy. I hope you enjoy this skills lab and the 3D Print design made by Dr. Andy Buck! If you have any questions or comments on this trainer, please let us know at sims.meded@gmail.com.
Videos:
- Tutorial Video on a donated cadaver
- Actual Cricothyrotomy in Combat setting (Warning: Graphic!):
Blog posts on how to perform a cricothyrotomy:
Material Lists:
Materials needed for 3D Printing:
- 3D Printer + appropriate software (more details about 3D printing in a separate blog post)
- 3D Print design. Thanks to Dr. Andy Buck who spent hundreds of hours perfecting the design for the neck and trachea and then made it freely available for download here on Thingiverse. I modified the design slightly by performing several “plane cuts” in a free 3D print design editor called Meshmixer to make the neck piece small enough to fit onto the printing platform I was using. This was a win-win for me since it reduced the amount of filament required to print the neck and reduced the amount of time it took to complete the print job. For instructions on how to navigate the 3D printing process, visit our separate blog post dedicated to 3D printers!
- 3D Print filament. PLA Filament
is recommended for the neck piece, while a flexible filament (e.g. ninjaflex, polyflex) is recommended for the trachea. However, if your printer can not print flexible filaments (many can not), then PLA works fine for the trachea as well. Make sure that you purchase the correct filament width that is compatible with your printer (the majority of printers use 1.75 mm wide filament).
Additional materials needed for the skill lab:
- Curved forceps
- Scalpel
- 6.0 ET tube (a smaller ET tube can not slide over the bougie and a bigger ET tube will not fit through the cricothyroid space on this model)
- Bougie
- Electrical tape
- EVO foam (1/8” is the easiest to work with, but you may use thicker foam to simulate patients who have more subcutaneous fat)
- Protective gloves (nitrile or latex)
- Optional materials if you want to simulate a bloody cricothyrotomy:
- Fake blood recipe (Blog post coming soon!)
- Snack-sized Ziploc bags
- Oven tray (or similar shallow container to catch the mess)

Great Design! Here is our open source cric trainer that you can either buy on amazon, or download the files and have printed yourself!
https://www.designbusinessllc.com/
LikeLike